
Update 11/08/21
I received an email from Clem who has written an awesome Add-In called Ribbon Icons which looks like below, to address the painful process I whinge about below for choosing and adding icons to your custom ribbon. I just can’t believe someone has nailed the solution to this horrible process a) you can search for an icon with a keyword b) you can add icons you like from your browsing c) you can get the sometimes lengthy case sensitive imageMso name which you couldn’t cut and past from the dialog box. Clem has generously made this Add-In free at Github follow this link . This Add-In is a joy to use and its hard to think of better of solution to this painful step in the process of customizing the ribbon. Thank you Clem!
![]()
Original Post
I recently finished a pet project of creating a custom ribbon in XML driven by an Add-In to access my personal macros. These are the ones you collect over the years and use in your day to day work to be more efficient. You either have these stored in a Add-In.xlsm or Personal.xlsb discussed in my last post. This post is about how you access these macros from the ribbon. Here is a shot of it.

I am pleased with the result and made it relatively easy to set up and maintain custom ribbons in a process I thought I would share with you. It’s been an evolution after trying two other approaches, namely:
- Native Customize the Ribbon
Iin Excel 2003 I had a custom menu for personal macros and used to have a custom menu for macros for my company and it worked well within VBA and so was contained all within Excel. I am not sure why the Microsoft Excel Development team has since Excel 2007 left it to the poor users and developers to cobble together a custom ribbon using Excel, VBA and XML. Actually this isn’t fair to the Microsoft Excel Development team, you can add macros to the QAT and Ribbon if you use the Customize the Ribbon and Customize the QAT commands using Personal.xlsb without any Add-in benefits and XML. And this may be enough for you if you just want to access a few personal macros. Even if you work from a couple of PCs you can export the native Ribbon customization and pick it up by importing to another PC. I tried it and was disappointed with the result, the limited, handful of icons (I wonder why Microsoft was so mean on providing such limited icons) and the ‘millions’ of macros to sift through to find your own – if you have a few 3rd party Add-ins it’s one big melting pot of macros. I also found this hard to maintain because after you change the macro name to something friendlier, you can lose track of exactly which one it actually was. - Ron de Bruin Menu Maker – I also tried a second option using a Ron De Bruin’s solution that meant less dabbling in XML and adapting John Walkenbach’s Excel 2003 era Menu Maker see https://www.rondebruin.nl/win/s2/win004.htm . As always such a practical approach from Ron and not a bad result. His Excel Automation site is a fantastic resource for anyone wanting practical approaches to common business problems. But in the end I found his Menu Maker was time consuming to maintain and easy to make errors that stopped the Custom Ribbon from working.
So I had a lot of time on my hands on a recent trip to India and bit the bullet and adopted Ron’s ‘full on’ XML method which uses the Custom UI Editor after looking at his examples in https://www.rondebruin.nl/win/s2/win001.htm .
My macros are in my Add-In.xlsm called MyMacros. But if your macros are in Personal.xlsb that’s fine too. Note all your macros for the Custom Ribbon need to have this code “control As IRibbonControl” in the first line between the parentheses e.g. Sub Macroname (control As IRibbonControl)
I had quite a few macros to load into my custom ribbon and because I hate tedious work in coding the XML needed, I decided to come up with an Excel Table to list out my macros and the icon names, label text etc with string based formulas to produce the XML code needed that I could then just copy and paste into the Custom UI Editor.
Thanks to Ron’s clear and approach, explanations and examples I could see the key to building the XML code is mainly just getting the following XML statements in the image below.

Now I don’t pretend to understand nor want to understand XML at all but like HTML, there is an obvious hierarchy and pattern we can see and use. The hierarchy is:
- CustomUI
- ribbon
- tabs
- tab id
- group id
- menu id
- button id
Then each level (except button) has a matching closing statement in reverse order like this </menu > then </group> and so on. Only the button level doesn’t have this as it’s closing bit is “/>”. The only text in the code that needed changes from me was:
- Line 4 Tab label
- Line 5 group label
- Line 6 menu label, size and imageMSO
- Line 7 button label, onAction (macro name) and imageMSO.
That’s it! Not so hard. So basically lines 1-3 and 10-13 are totally static and Line 4 we just need a label change. Then we just need to change lines 5-9 for group names (label), menu names, size and icon and button labels, the macro name and the icon. So being a hard core Excel formula fan from way back, I knew a formula could amend these standard XML statements for lines 5-9 which I could then, along with the Static Code lines 1-3 and 10-13 plus line 4 with its one change, copy and paste into the XML file via the CustomUI editor .
So I set up a Table so each row would tell allow formula to decide if it was the start, middle or end of a group or menu or if it is was a button. So here is an image of my Table. OK I put in some Conditional Formatting to more easily see the start and stops of Groups and Dropdown Menus but you can leave it raw without much formatting if you like. I also set up some validation of the Table such as validating the Table for disallowed characters (mainly “&”,”<” and “>”) and ensuring there were the same number of opening and closing Group and Menu Dropdown statements but this is not essential.
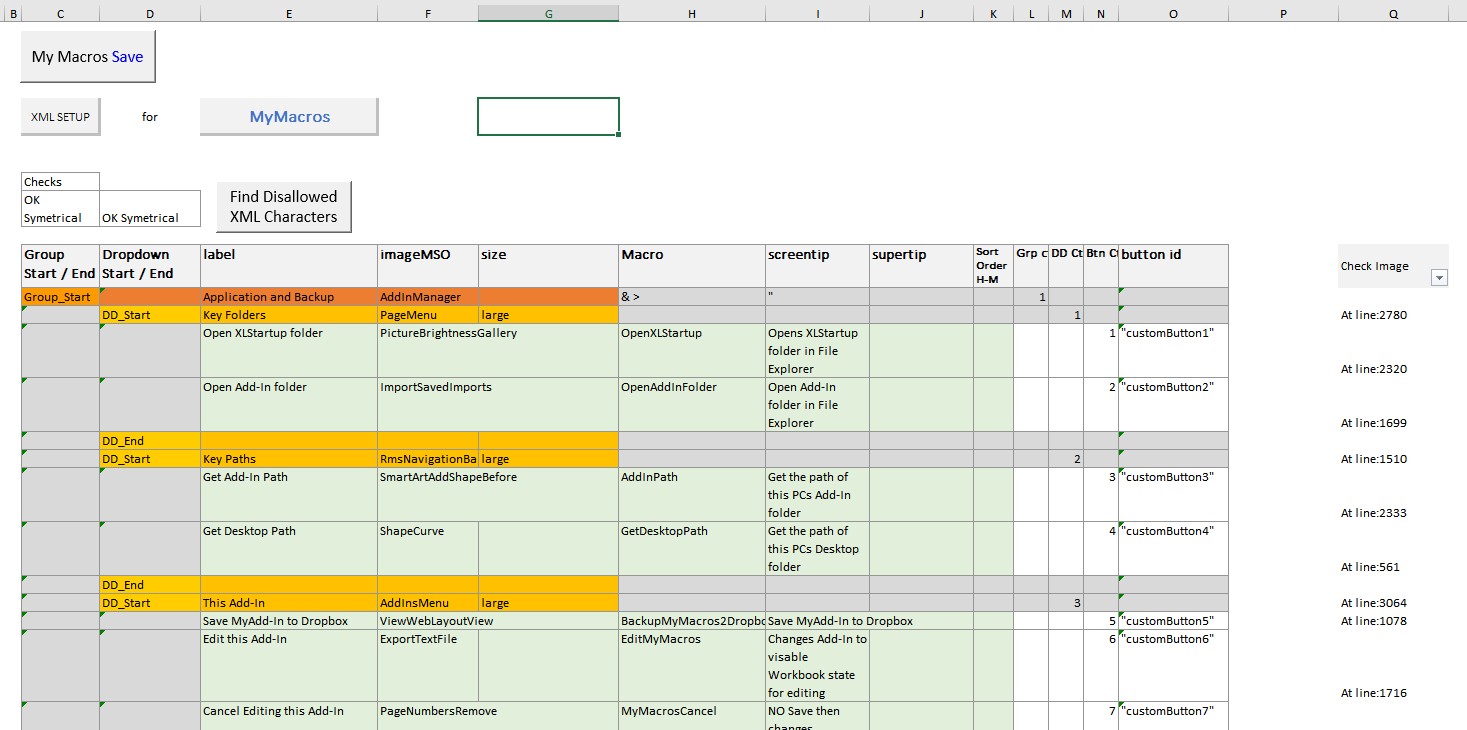
But then there is the most painful step. Getting the names of the imageMSO or icons you want to appear on your Custom Ribbon. I found this to be THE most frustrating part. There seems to be no easy way to cut and paste the names which are often very long and case sensitive. Plus, there are thousands of icons Microsoft uses throughout it’s Office software to choose from and there is no searching or filtering functionality – just Galleries to go through. I found the best approach was downloading an Microsoft Add-In called Office2007 Icons Gallery Workbook (you will need to Google for this as the link I had has been changed) opens up nine Galleries one by one and scribble down the name (accurately) you like and enter to your table.
Note to the right of my Table in Col Q called “Check Image” there is a check if the row has a valid imageMSO name by returning the line number of a list I downloaded to a section out to the right. Reason being these image names are case sensitive in Sentence Case and some are pretty long so it’s easy to get them wrong.
Better to validate them to a list before finding this out in the CustomUI editor. The link for the download of this list is here. https://www.microsoft.com/en-au/download/confirmation.aspx?id=21103 . The formula used is:
=IF(OR(MID(tblXMLSetup[@[button id]],2,12)=”customButton”,tblXMLSetup[@[Dropdown Start / End]]=”DD_Start”),IFERROR(“At line:”&MATCH(TRUE,EXACT(tblXMLSetup[@imageMSO],BB:BB),0),”IMAGE INVALID”),””) . It checks if the line relates to the start of a dropdown menu or relates to a button which are the 2 items which have images.
The formula for the code OTHER than the static beginning and ending code is as follows:
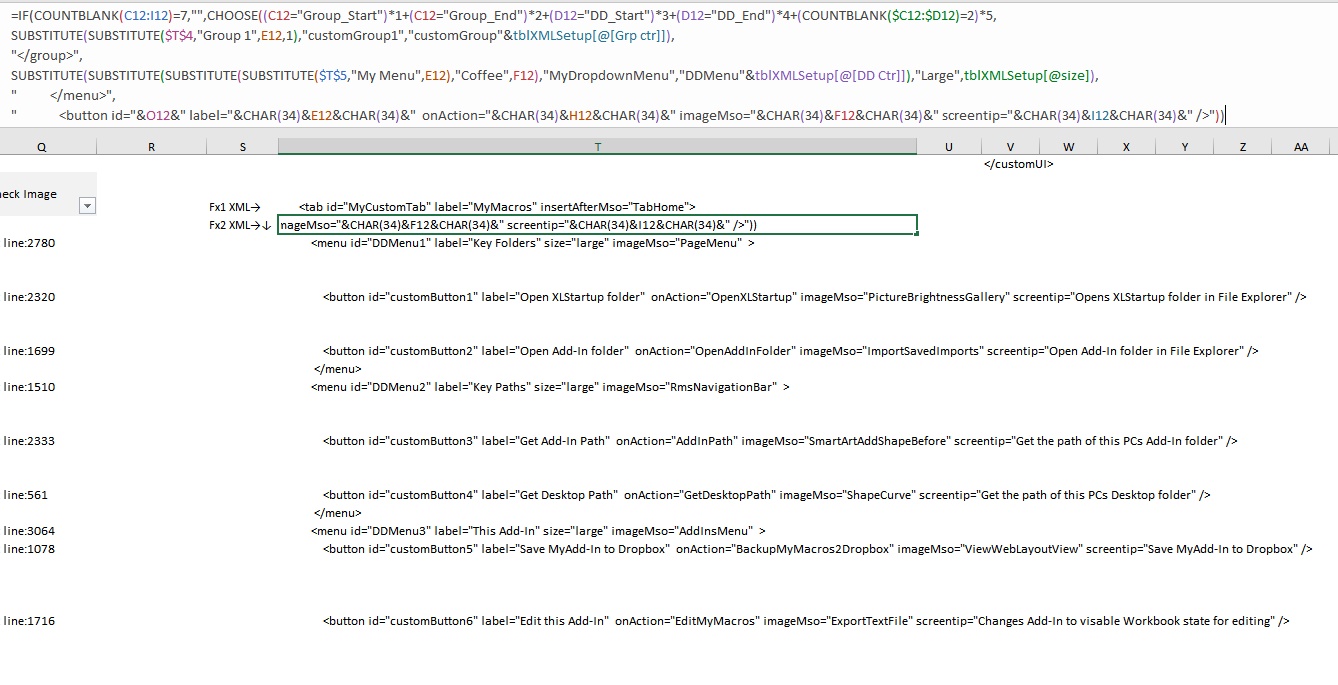
=IF(COUNTBLANK(C12:I12)=7,””,CHOOSE((C12=”Group_Start”)*1+(C12=”Group_End”)*2+(D12=”DD_Start”)*3+(D12=”DD_End”)*4+(COUNTBLANK($C12:$D12)=2)*5,
SUBSTITUTE(SUBSTITUTE($T$4,”Group 1″,E12,1),”customGroup1″,”customGroup”&tblXMLSetup[@[Grp ctr]]),
“</group>”,
SUBSTITUTE(SUBSTITUTE(SUBSTITUTE(SUBSTITUTE($T$5,”My Menu”,E12),”Coffee”,F12),”MyDropdownMenu”,”DDMenu”&tblXMLSetup[@[DD Ctr]]),”Large”,tblXMLSetup[@size]),
” </menu>”,
” <button id=”&O12&” label=”&CHAR(34)&E12&CHAR(34)&” onAction=”&CHAR(34)&H12&CHAR(34)&” imageMso=”&CHAR(34)&F12&CHAR(34)&” screentip=”&CHAR(34)&I12&CHAR(34)&” />”))
OK it’s a doozy I know but if you open up the formula edit bar and get a strong coffee it’s not so bad. CHOOSE is the perfect formula for this situation because you want five different formulas to handle five different (mutually exclusive) situations encountered at each row – start and end of a group, start and end of a dropdown menu and a button. To keep it as short as possible I used Boolean logic multiplying each mutually exclusive test for the CHOOSE Index Number by 1,2,3,4 or 5 each which have one of five formula or text results if the test is true. I also used SUBSTITUTE which was also perfect for substituting default text for text in my Table. See Col T in below for the result:
So then once ready I copy and paste values to a text programme (I use Notebook++) to assemble:
- the static lines of code 1-3
- line 4 with it’s one simple change
- the code generated by the above formula for each Group, Menu and button you want on your Custom Ribbon and
- finally the static lines of code 10-13 into the one text file (I use Notebook++).
I could have done some VBA to assemble the above four components and probably will in the future but I was rushing to see the result so left it as a manual process for now.
I save and close the workbook and open the CustomUI application (you can get the details of downloading this from Ron’s site at the above line) and open a file for your workbook containing the macros (in my case it was an Add-In.xlsm file called myMacros) and copy in the text you have just assembled. You then have verify the code and if there are errors work through them until it verifies the code is correct. I am not saying this is easy but the code required is logical and in my case it was mostly because of spelling errors in ImageMso names which are long and case sensitive. So this is why I added the extra column and downloaded the full list to find the errors in the workbook before copying. Save and close the XML file. Then open your Workbook and (hopefully) your Ribbon menu will appear. Note I learned this the hard way – NEVER have your workbook and the XML file in the CustomUI application open at the same time. You will lose work. I didn’t know this and would open my workbook to find recent changes I knew I had saved were lost.
So not an easy blog topic to describe and I bet for you to read sorry and sorry for it’s lengthiness…but
In Summary the process was:
- Read the articles thoroughly and download the examples from Ron de Bruin’s Excel Automation site.
- Download and instal the CustomUI Editor software with links again on Ron de Bruin’s Excel Automation site. Download the valid list of
- Assemble your macros in your Add-In or Personal.xlsb file. You must have the (control As IRibbonControl) after the macro name e.g. Sub EditMyMacros(control As IRibbonControl)
- Create your Excel Table for all the macros you want on your Custom Ribbon organised as you want in Groups, Dropdown Menus and Buttons. Add the formulas to create the XML code.
- Get your imageMSO names from the Microsoft Add-In Office2007IconsGallery.xlsm at the above link in the Galleries under the Developer tab.
- Assemble and copy the three components of XML code (Opening static, the line 4, Save and close your Excel workbook and then open the file in CustomUI Editor. Validate, tear your hair out and correct the code and then save in the CustomUI editor and then afterwards make sure your Workbook is corrected so you won’t repeat the error.
- Open Excel and weep with joy if your Custom Ribbon appears as you want it
- Have a couple of nice cold beers and enjoy your ribbon.
I am not saying this process was easy but you get used to it and I found the formula driven XML code you can conquer and make work. There are Add-Ins or software out there you can buy to avoid all this and have your Custom Ribbon with less frustration for sure. One to consider is at the The Spreadsheet Guru (Chris Newman’s site) which I haven’t tried but his site is quality blogging on Excel and VBA tips so it would be worth considering. But I like the fact I have ‘kind of’ learned how this Ribbon Customization works from the basics which I can now do this for clients.
If you need help with an Add-In and Custom Ribbon to manage and allow access to your staff of company’s macros please contact me.